Well, Cartman’s quote (from which my headline is derived) is a bit…saltier than that. But this is a family show.¹
Thanksgiving is coming up, but really, do you need an excuse to think about pie? I know I don’t, especially when I recently attended an event at Greenlight Bookstore in Brooklyn with my favorite Brooklynites, Alex & Johnny. To be 100% honest, I’m not sure what attracted me more – the fact that the two sisters would be discussing and signing their new cookbook, released that day, no less, or the fact that they were giving samples after the talk.
Mayhap you’ve heard of Four & Twenty Blackbirds pie shop in Brooklyn. Run by two farm-raised sisters from South Dakota, it’s essentially a place to go eat pie and drink coffee. But it’s oh so much more than that. Think of your happiest memory right now. Mix it with your biggest future dream. Then add pie. That’s just scratching the surface of this little slice (see what I did there??) of heaven. I like the sisters because they’re down to earth and self-taught and sweet and inspiring and brought their mom to their book signing and make ridiculously good pie. If ever there were a time for the word ‘redonkulous’ (really, is there ever?) it’s here. They also encourage feedback and questions and said during the talk that they gave all of their secrets away in this cookbook. I love Midwestern practicality and honesty.
Anyway, Alex and I elbowed our way to pie samples and I’m fairly certain we had way more than our share. Research purposes, of course. And I did buy the beautifully written and photographed cookbook, ‘The Four & Twenty Blackbirds Pie Book’ before the talk. Naturally I’ve been sitting with the pie book in bed since then, drooling over photos and planning recipes for the upcoming Thanksgiving holiday.² Who needs turkey when you can eat pie? Savory, sweet, fruit, custard – bring it on, I’m all in.

My two standard pies are my pumpkin pie and my mom’s deep dish caramel apple pie. I’ve never found an apple pie that can compare to Mom’s, so obviously this means PIE THROW-DOWN with Four & Twenty Blackbird’s Salted Caramel Apple Pie. But before we go any further, I have a confession. I’ve never made a pie crust from scratch. (I know, I’m filled with shame.) Why would you, when they abound in the frozen section of your nearest grocery store? Plus, the idea of working with delicate pastry scares me. I don’t really ‘do’ delicate anything. But the Elsen sisters convinced me that it could be done, and provided step-by-step photos and diagrams for comfort when moments of panic started creeping in. Another point in homemade pie crust’s favor – it can be done in many little steps over many days, so if you don’t have all sorts of free time to engage in the pie crust arts, you’re still a-ok because you can refrigerate or freeze it for later use.
As an aside, I just had to get up and wash my hands because I’m eating my first slice of this pie as I type and I keep forgetting about typing and just focus on the pie and my hands are buttery and caramel-y and that makes the keyboard sticky.
Ok, I lied. It’s my second piece of pie.
I did make this pie over several days’ time because of my travel schedule and it still turned out beautifully. For my first totally-home-made pie, I’m pretty darn impressed with myself. Those of you with years of pie crust experience may dismiss my newbie excitement but I don’t care, I’m the one eating salted caramel apple pie with extra caramel sauce drizzled on top right now – what are YOU doing, huh?
I would like to point out that I have not made a single nerdy pi joke yet. Nor am I wearing my pi-rates shirt. I think it’s all of the caramel I’ve ‘accidentally’ ingested today. Onward to pie! The post is a long one because I include a lot of pictures and there are many steps, but they’re little steps broken into manageable chunks. Bear with me; the pie is seriously worth it.
The Crust
First, the crust. It does involve a rest period in the fridge, so take note. This crust will make two 9-inch crusts (a ‘double crust’ recipe), one for the bottom of the pie and one for the lattice on top.

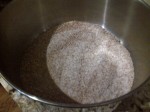
My kosher salt box is indeed damaged. I don’t want to talk about it. The vinegar gives the crust a slight tang, but if I didn’t tell you it was in here you’d never know. Anyway, cube the butter. There are a handful of kitchen tools that I would marry if I were a kitchen tool; my bench scraper is one of them. You want to cube the cold butter and then put it back in the fridge to keep it cold until you’re ready for it. Did I mention the butter should be cold?

Cut the butter into your dry ingredients with a pastry blender. It’s good to have a flat-bottomed bowl here for stability while blending the butter. And yes, I have a bacon bandaid on my finger. You’d think we have little kids here – we have bacon, ninja and mustache bandaids, but no normal ones.

Keep going until the butter is in little pea-sized chunks. You do not want large chunks of butter here.

Easy so far, right? Right. Now it’s time to doctor the crust a little. Mix the wet stuff together for a vinegary ice bath.

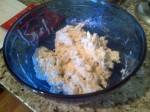
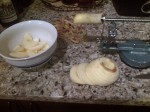
Dip a tablespoon in there and start adding liquid, 1-2 TBS at a time, mixing with the pastry blender each time. Keep going until the dough starts to form – it will mostly be sticky, with a few little dry bits here and there. Mold the dough into a ball – run your fingers through it a time or two to make sure there aren’t any large butter chunks in there. You want it to be marbled. But don’t knead it like bread or mix too much, that would be bad for reasons of which I’m not entirely certain. Probably something to do with gluten. Get some plastic wrap, plop the ball of dough on there, and cut it in half.

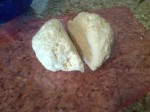
Flatten each half into a round disk, wrap tightly with plastic, and stick ‘er in the fridge for at least 1 hour, preferably overnight, to let the gluten relax and the crust ‘time to mellow.’ I assume that means you crack a few beers, play it Jimmy Buffett songs? I opted for the Johnny Cash radio station on iTunes. It seemed to work. You can leave this in the fridge for up to three days, or freeze it for one month. Before you roll out the dough, let it sit at room temp for 10-15 minutes so it doesn’t crack.
This next part depends on whether you have two rolling pins or one. If you happen to have a French (tapered) rolling pin use that to start. Roll out the disk on a floured surface until it’s about 8-9 inches across, and then finish with a standard rolling pin, or just use the standard rolling pin the whole time. (The French one allows for a bit more leverage around the outside of the circle but does put pressure on the center, and you don’t want to stretch the dough.) You’re supposed to have a disk about 11-12 inches across; mine was more of a trapezoid. Oh well. Also, don’t throw away the plastic wrap from the two dough halves.


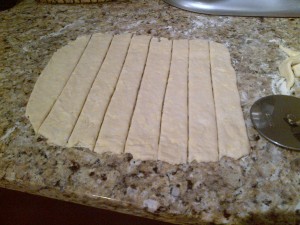
For the top of the pie, the lattice, cut the ends off the sides of one of the disks with a pizza cutter, and then slice up eight even strips. When you’re done, transfer the strips to a cookie sheet covered with parchment paper (or well-floured).
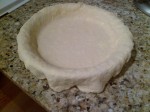
Use a glass pie plate if you can – it distributes heat more evenly than aluminum, and you can check the bottom of the crust while it’s cooking. For the bottom of the pie, fold the other disk in half and gently place it in the center of a well-buttered pie plate (edges facing out). Gently is the name of the game here. Unfold the disk over the pie plate so it hangs over. Pick a place to start and gently lift the overhang up a little and let the dough naturally slide down the side of the pie plate. Go around the whole pie, and when you’re done press gently (gentlYYYY³) into the sides of the pie plate to make sure there aren’t big gaps or air bubbles. Finally, take the pizza cutter and run it around the side of the pie plate to trim the overhang; you’ll want 1-2 inches (as measured from the inner ring of the pie plate).


Use the plastic wrap that you hopefully didn’t throw away – it’s already greased up from the dough, so it works well here to wrap the crust in the pie plate and the strips on the cookie sheet for a second rest in the fridge. I wish I could take this many naps. Refrigerate it for at least 30 minutes, preferably an hour, and up to three days (or frozen for up to one month). And that’s the crust!
The Filling
For the filling, make the caramel, and while that’s cooling, core, slice and peel the apples, and then do some mixing magic.
I felt awfully proud when I ended up with a bubbling vat o’ caramel. Whisk sugar and water together in a medium saucepan over medium-low heat just until the sugar is dissolved. Add butter and bring to a slow boil – low and slow is the way to go, you don’t want the sugar burning.

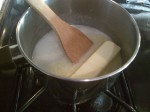

Keep stirring constantly as the mix continues at a slow boil. It will bubble and foam a little and start to thicken. Keep stirring, because the color change will happen quickly. When it turns a deep golden brown, remove it from heat and immediately, but slowly, drizzle in heavy cream while stirring. As you can see, the mixture will bubble and steam a bit, but that’s ok. Let cool while you prepare the apples.


It’s so pretty! You may also notice the powdered sugar residue. That’s from me accidentally dumping an entire bag of powdered sugar into the caramel pot. The universe decided that today it would like me, so the bag ended right side up, with only a little caramel splashing and a little dusting of sugar popping out. I would have actually cried had this gone any other way.

Now, juice two lemons into a big bowl.
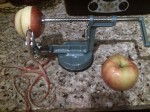
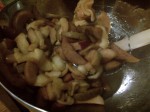
I strongly suggest you get an apple corer/slicer thingy. If you ask for it by that name at an apple orchard or probably a Target or something, they’ll know what you’re talking about (because that’s how I got mine). It peels, slices and cores in a flash and is fun to use! You can also slice apples into thin wedges if you’d like. I happened to have some thin wedges already sliced, and then I used the corer/slicer thingy on the rest of them. The reason you want them more uniform and thin is for packing purposes – thinner and more uniform means more apples in the pie, fewer air pockets, general pie integrity and deliciousness, etc. I feel like a little kid playing with toys when I use this.

I work for a fabulous company and boss who decided that, because we all travel too much and never see each other, we should have a day out together. On a perfect fall day we drove out to the middle of nowhere and picked apples at an orchard (and fed goats and sheep and llamas and baby donkeys and emus and saw piglets race and swung on ziplines). Yes, racing pigs.


As a result, I had a mix of Jonagold, Honeycrisp, Granny Smith and I think a Liberty and Pink Lady. If you’re making any kind of apple item – applesauce, apple pie, etc – it’s best to have a mix. If you can only find two kinds, use Granny Smith and then a sweet-tart firm apple (Jonagold, Braeburn, Honeycrisp, Fuji, Pink Lady). The firm textures will hold up and not overpower the pie with sweetness.
Add the slices to the bowl with the lemon juice and dredge the slices around so they’re all juiced up. Sprinkle with some sugar and set aside for 20-30 minutes. The lemon juice should protect it from browning too much, and the sugar will help the apples soften and release juices.
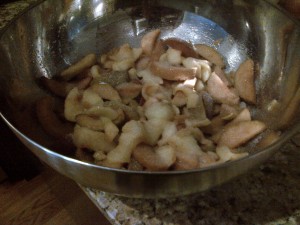
Put some raw sugar in a small bowl. You can find raw sugar at the grocery store – there’s Sugar in the Raw and other brands. It looks like big, brown crystals. I happened to have turbinado sugar in the raw, so that’s what I used. Shake some Angostura bitters over the sugar. I had to go to the liquor store to find a small bottle. The Elsen sisters say bitters are an ingredient that give the pie ‘a little something,’ so I used it. I don’t want my pie to be a little something-less. Mix in some other apple pie spices (cinnamon, nutmeg, etc). Carefully add the apples into the spice mixture, leaving behind excess liquid. Nobody likes a soggy pie. I used a pasta scoop to transfer the apples over. Gently mix the apples so the apples are covered evenly in the spice mix.

Preparing the Pie
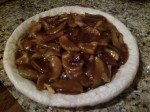
Grab your pie crust and sprinkle some flour and sugar in the bottom – this helps suck up any excess juice. Pile the apples into the crust, mounding the apples a little higher in the middle. Pour some caramel evenly over the apples, and sprinkle with some flaky Maldon salt.


Either do the lattice yourself or grab a school-aged girl who can braid.
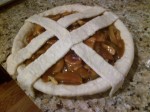

Trim any big overhangs from the lattice strips, and crimp the sides of the pie. Form a C with the pointer finger and thumb of one hand, gently press it against the side of the pie plate rim, and while pressing in toward the pie use the thumb of your other hand to press outward in the middle of the C. Work your way around the pie. When you’ve crimped and latticed, brush the pastry with an egg wash and sprinkle with more raw sugar and a little coarse sea salt.

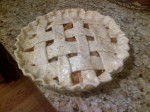
Let the pie sit in the fridge for 10-15 minutes to set while your oven preheats. Now, this part is critical – bake your pie on a rimmed cookie sheet, or on some aluminum foil with ends turned up. Otherwise, the bubbling over will burn on the bottom of your oven and that really, really, really blows. And stinks. Start the pie on the bottom rack of the oven – this helps set the crust and allows for more even browning. About halfway through, move the pie up to the center rack. The pie is done when it’s a deep golden brown and the juices are a-bubbling.

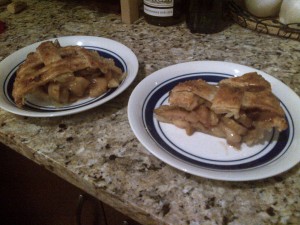
The hardest part of this entire thing – now you have to wait. I was NOT happy about this. Smells of buttery pastry and spiced apples had been torturing me, and I have to wait? But you do – you want your pie to set and not be a runny, gloppy mess when you serve it. Put the pie on a wire rack and let it cool for at least 2-3 hours. This actually does help the pie set, I’m sad to report, because I’d love to just shove my face in it right away. I set a timer for two hours – I didn’t think I was going to make it – and dug in the second the two hours were up. The slices held – well, for about a nanosecond, after I drizzled it with leftover caramel sauce and savored every incredible, hard-earned bite.
Even Sergei got involved – he came creeping around, trying to figure out what had so captivated our attention.

It looks complicated, and maybe it is a little, but man, it is worth it. I can’t wait to try more recipes from the book, now that I’m not scared of making my own pie crust! And it’s huz-approved – he said this is the first time he hasn’t ignored a pie crust, he actually likes it. A printable link is at the bottom. Enjoy!
¹ Well, it’s a family show in the main text. Footnotes are another story: “I would never let a woman kick my ass. If she tried anything, I’d be like, EH. You get your bitch ass back in the kitchen and make me some pie!”
² I really do read cookbooks and food magazines for fun. It’s kind of an addiction.
³ Buttercup: “At a time like this, is that all you can think to say? Gently?” Westley: “GentlYYY!” (thump)
Salted Caramel Apple Pie


